Repo Maintainer Instructions
This section is for repo maintainers
The starlink_position repo
Overview of repo structure
The repo has a folder for each major project that delivers code or files, and a docs folder that contains markdown files with documentation delivered by the gh-pages website. Under the docs folder is an images folder containing the images used by the various pages.
gh-pages (GitHub Pages)
This repo is configured to publish the markdown files in the docs folder as a set of html pages rooted at https://maddox-zephyr.github.io/starlink_position/. It uses a GitHub capability called GitHub Pages (or gh-pages). Whenever someone commits a change to the main branch of the repo. the website is regenerated from the .md markdown files in the docs directory (and any referenced images), and the markdown (.md files) are converted to html files, for use by a browser.
The landing page is index.md, and it contains links to the other pages. The links reference the html files, which will be the product of .md files. For example, index.md contains the following:
See the [repo maintainer instructions](repo_maintainer_instructions.html) for...
The text in square brackets: “repo maintainer instructions” is the text of the hyperlink, and the hyperlink itself is “repo_maintainer_instructions.html” in the current directory. repo_maintainer_instructions.html is autogenerated from repo_maintainer_instructions.md - this file in the repo.
The job of maintainers is to create & update markdown (.md) files, as well as any necessary software. These markdown files specify formatting and links and images for when the files get transformed into html pages on the website.
Markdown
In a markdown file, you use special text syntax to tell how to format your page. You can google markdown format to get the common features that format text, but here’s a quick reference:
Headings
# Heading level 1 - makes a level 1 heading
## Heading level 2 - likewise
### Heading level 3 - likewise, and so forth, for some number of levels
Formatting
Surround text with double asterisks to bold it, or single asterisks to italicize it.
Lists
A ‘-‘ in the first position of a line introduces a bullet into a bulleted list. A number then period introduces a numbered item into a numbered list
- first item in bulleted list
- second item in bulleted list

1. first item in numbered list
2. second item in numbered list
Hyperlinks
You can link to external web pages, or to pages generated from this repo. The form is:
[text to display as link](hyperlink_to_web_page)
hyperlink_to_web_page can be an external page like https://google.com, or a local page like repo_maintainer_instructions.html. Note the .html extension; the hyperlink must refer to the html page that is generated by gh-pages from the corresponding .md file.
Images
Put images in the images folder. Refer to them like this:

The text you put in square brackets doesn’t matter, but the hyperlink in parentheses needs to be the image filename relative to the docs directory.
GitHub repos
GitHub contains the master copy of this repo in the cloud, including its entire history. Maintainers should make changes to the master copy of the repo using the bespoke workflow for starlink_position described below
Collaboration on GitHub
There are several collaborators on this project, and some way of allowing each of us to work independently, yet not step on each other’s toes is needed. This is the purpose of the Bespoke Workflow for starlink_position - it states how we need to all behave in order to not step on each other’s toes, while not unduly burdening those unfamiliar with git practices.
The Bespoke Workflow for starlink_position is what’s used when updating this repo. It offers maintainers a choice of the Quick & Dirty procedures or the Best Practice process, and uses WhatsApp to acquire or release the right to edit main exclusively.
The Quick & Dirty procedures are fine for making moderate-size to a file that you expect you’re the only one working on. You directly change the repo in the cloud. It is simple, but it can fail if someone else makes a change between when you start editing and when you want to commit your changes. This should not happen if maintainers are all using the Bespoke workflow for starlink_position described below.
The Best Practice procedures is good when you are going to be working on a line of development for some time, during which time others may make changes in the repo. It is more complicated, involving local and cloud repos and getting changes synced between the two. It requires considerable familiarity with git and GitHub. It is not described here - if you know you know.
Git + GitHub concepts and terminology
Git
Git is version control software - it tracks changes in files and folders under a root project folder. It enables switching between different states of the files and folders. Changes are recorded as differences in files and folders between different commits. A commit is when you tell git you want to record the current state of the files and folders (typically when you reach some natural stopping point). Git saves the changes from the last commit. A commit can be thought of as a checkpoint.
Git supports the notion of “branches”. A branch is a string of commits off of some point in the project’s history. They are used to avoid multiple collaborators stepping on each others toes as they potentially change the same files/folders. The main branch is called “main”, and there is a paul_work, bruce_work, and a rui_work branch that you can use. You can also make your own branches.
GitHub
GitHub is a website that hosts the “master copy” of the repo in the cloud. It offers ways to update the master copy using its web pages.
Master copy update procedures
In the Quick & Dirty procedure, maintainers edit files in the master copy directly using the GitHub website.
In the Best Practice process, maintainers get a copy of the repo by cloning it into a local folder. Maintainers then commit changes to their work-branch in their local copy. When ready to push changes to the cloud, maintainers pull any updates from the cloud, then merge their work-branch to the main branch then push main to the master copy in the cloud. Other Best Practice maintainers pull the latest changes to main down from the cloud into their local repo copy, where they are (usually) merged automatically. Cruising skippers probably don’t want to become git experts, and this process, which is used by software development teams, is probably too complex and heavyweight for cruising skippers, but preferred by SW devs.
Quick & Dirty workflow procedure
Open the repo in GitHub and navigate to the file you want to edit.
For example, navigate to https://github.com/Maddox-zephyr/starlink_position/blob/main/docs/starlink_setup.md on the main branch. See the screenshot below.
 .
.
Editing markdown files
The right red arrow points to the edit button. When you press it you get an editing web page that allows you to directly edit the file. You will have a green commit button on the top right of the editor screen. When you’re done editing, press the commit button and you’ll have the opportunity to change the auto-generated commit message, then the change will be committed. If you edited the main branch, the website will immediately be updated and you can reload and check your work in another browser tab.
The left red arrow points to the branch selector drop-down. You can select to edit on the main branch, or on your work-branch, like rui_work. If you edit on the main branch, there is some danger that another maintainer may edit and commit a change to the file you’re working on. If that happens, you’ll get an error when you try to commit your change, and you may need to reapply your edits, so save them away somewhere.
Adding images
When updating a .md documentation file, you frequently want to include images, such as screenshots and reference them in the text. Using the Quick & Dirty workflow you can do this easily:
- Capture your screenshot and mark it up with arrows or however you want and save it to a file with some meaningful name.
- On the github web page, navigate through the docs folder into the images folder.
- On the right side, click the Add Files button, and select
Upload files. See the image below.

- The next page will allow you to drag & drop files, or select files.
See the image below if you choose to select files.
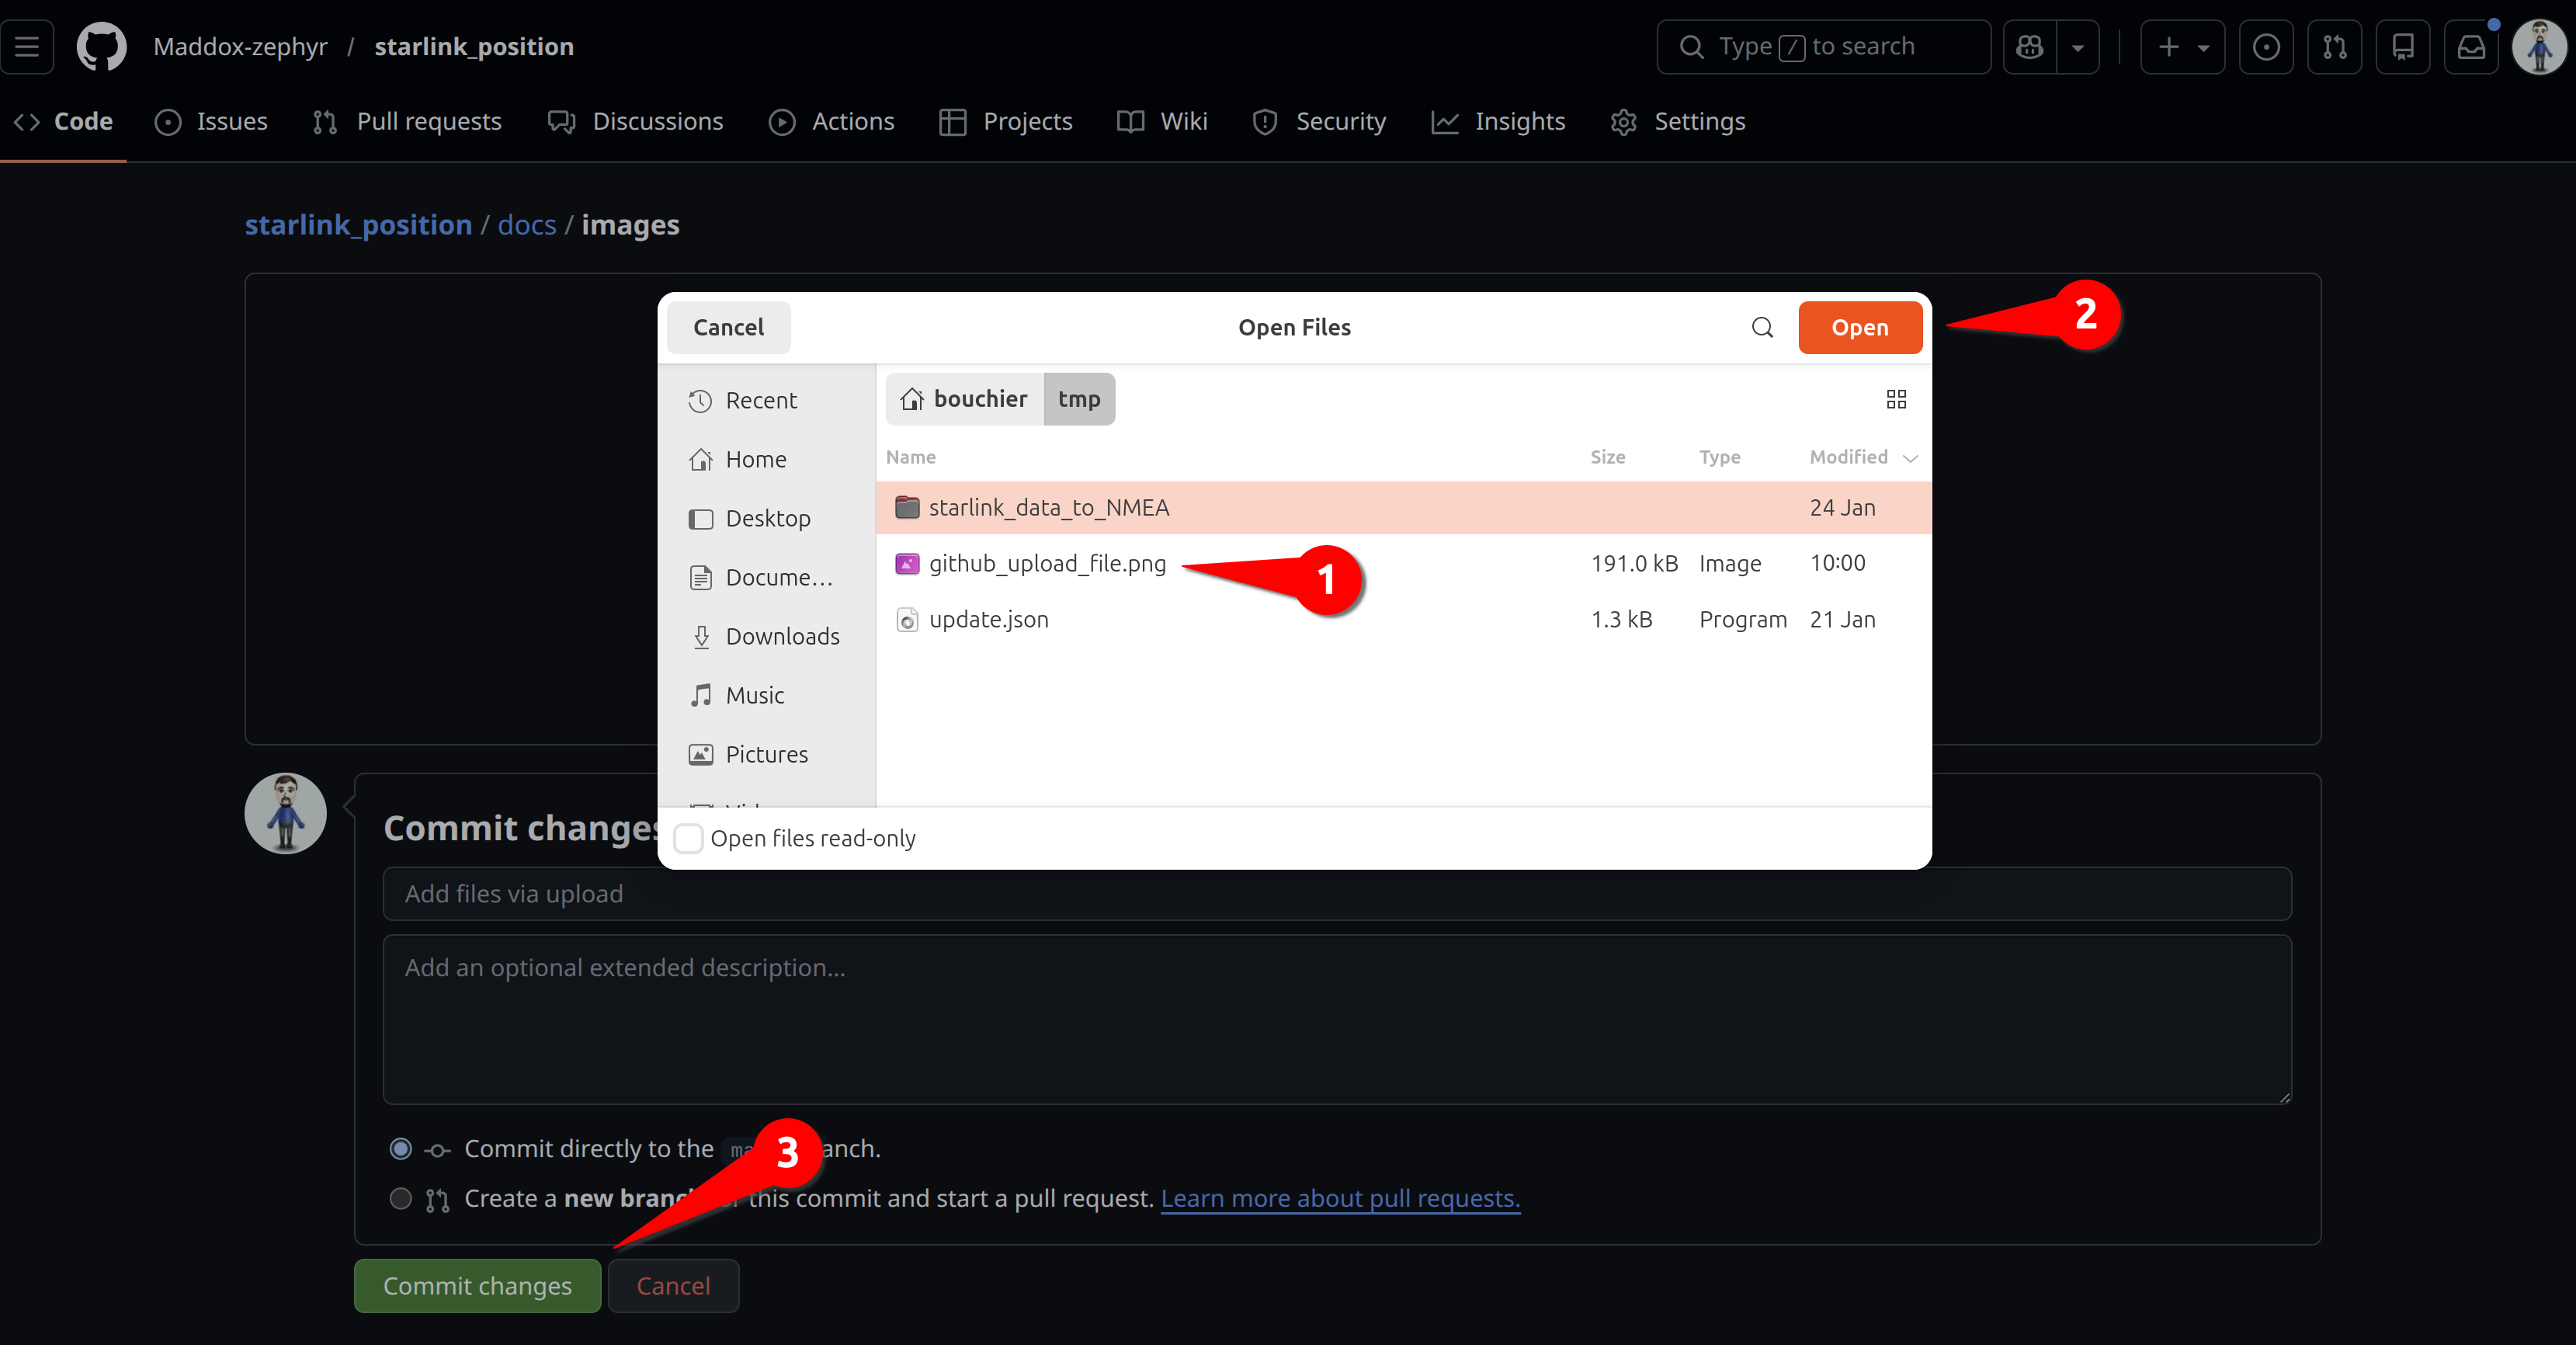
- You can select more than one file
- Open the selected files. They will be uploaded.
- When you’ve uploaded the file(s), press the Commit button to commit them to the repo
- Edit the .md file and reference the image where you want it to
display by putting text like this in the .md file:
[image name](images/YOUR_FILENAME.jpeg)
Try to use common image formats like jpeg or png for maximum compatibility.
Bespoke workflow for starlink_position
We are using a bespoke workflow for making changes to the starlink_position repo. It aims to balance convenience with safety for multiple maintainers working in the same repo, potentially on the same files.
The Bespoke workflow for starlink_position allows using either the Quick & Dirty procedures or the Best Practice process, but in either case augments with a WhatsApp message to other maintainers.
- When you want to make changes to the main branch in the master copy on GitHub, grab exclusive control of the repo by announcing on the maintainer’s WhatsApp group that you are editing the repo and no-one else should edit it until you announce that you’re done. Check first that no other maintainer grabbed control.
- You can use the Quick & Dirty procedure to directly edit on the main branch.
- Whenever you’ve committed, reload the web page in another tab and see whether you’re happy with how it looks. If not, go back and edit and commit some more. Updates to the web page happen within seconds of a commit to main
- Maintainers who are knowledgable with git and the Best Practice workflow, may edit locally on their work-branch, but must grab the right to push to main by sending a message to the WhatsApp maintainers group before pushing updates to main, so as not to get tangled-up with another maintainer. As with Quick & Dirty, first check that no-one else has grabbed permission. This is a “gentlemen’s agreement” workflow.
- Reload the web page you’ve been working on and check that all your changes are rendered correctly.
- When you’re done, announce to the maintainer’s WhatsApp group that you’re done. Now anyone else can grab editing control.